
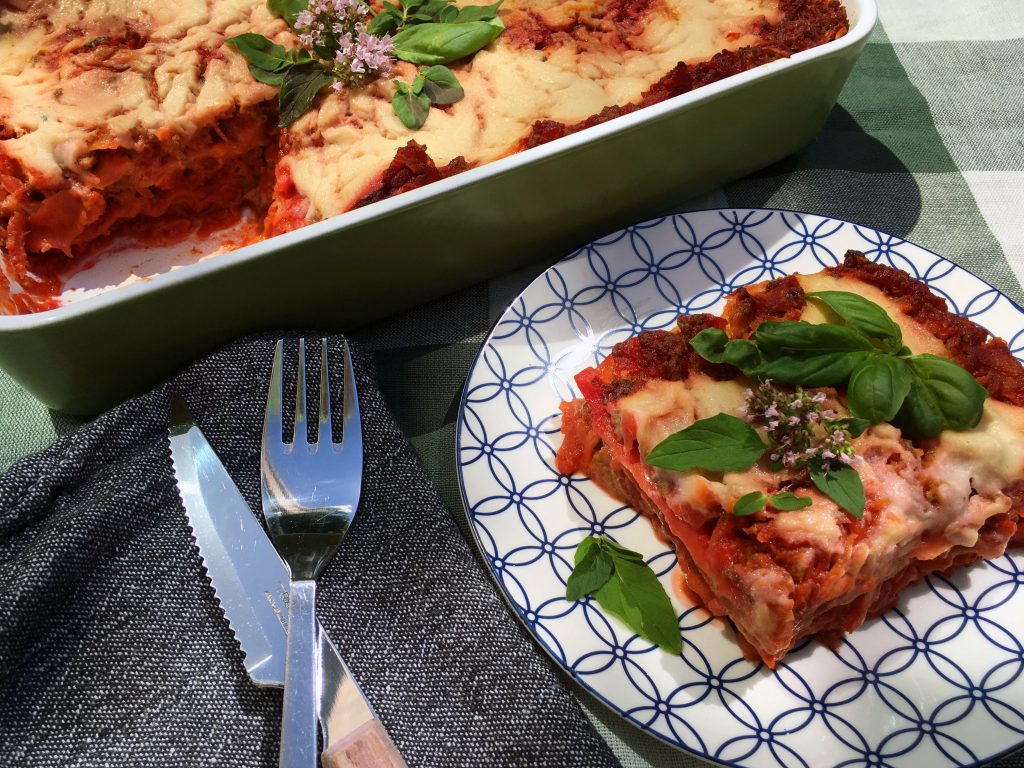
YES! Lasagna….. o/ At least that is how I felt when I made this low histamine lasagna for the first time. And when my son responded to it, with a big thumbs up and calling it perfect, I was over the moon with happiness 😀 I mean, I made a low histamine lasagna, nightshade free, and dairy free, and my picky eater of a four year old loves it! I can barely believe it 🙂
For me, lasagna is one of the ultimate comfort foods…. and I have no need for it to be any shade of healthy what so ever…. just creamy, salty and comfy!! That being it said, it is one of those dishes that takes some time and dedication to make. When I make it completely from scratch including making the nomato sauce first, it takes me about 2 hours and 15 minutes. So you need to have the time necessary to cook this.
If you haven’t already made the Histamine Friendly Nomato Sauce, you need to start with that. You can find my recipe for Histamine Friendly Nomato Sauce here, make sure that you only add 2/3 of the bouillon/water, otherwise the meat sauce will be too wet. Note 1/2 a portion of the nomato sauce recipe is more than enough for making one lasagna. Once you have all the ingredients for the nomato sauce cooking away in the pot, you can get going with the meat sauce for the lasagna. Dice the onion and celery sticks very finely. Or if you are too lazy like me, this is when you get out your food processor and process it till it is finely chopped but not pureed.

Heat up the (extra virgin) olive oil and add the celery and onion to the pot and cook, stirring a few times, until the onions are translucent. Add the garlic, and let it cook with the onion and celery for a bit – don’t let it brown. Turn the heat down to medium low and add the ground beef, and make sure to break up the meat, so that no big lumps are formed. Minced meat, can be a problem for some people with histamine intolerance, I find that if I get it really fresh from the butcher, I tolerate it much better than if I buy it from the supermarket. As an extra bonus my butcher has “minced meat day”, where they ground the meat and then sell it with discount 🙂 Total double win – fresh meat and discount. So have a conversation with your butcher, and make sure the meat is fresh. If you really don’t do okay with ground beef, you can try ground turkey, or lentils if you don’t eat meat and tolerate them.
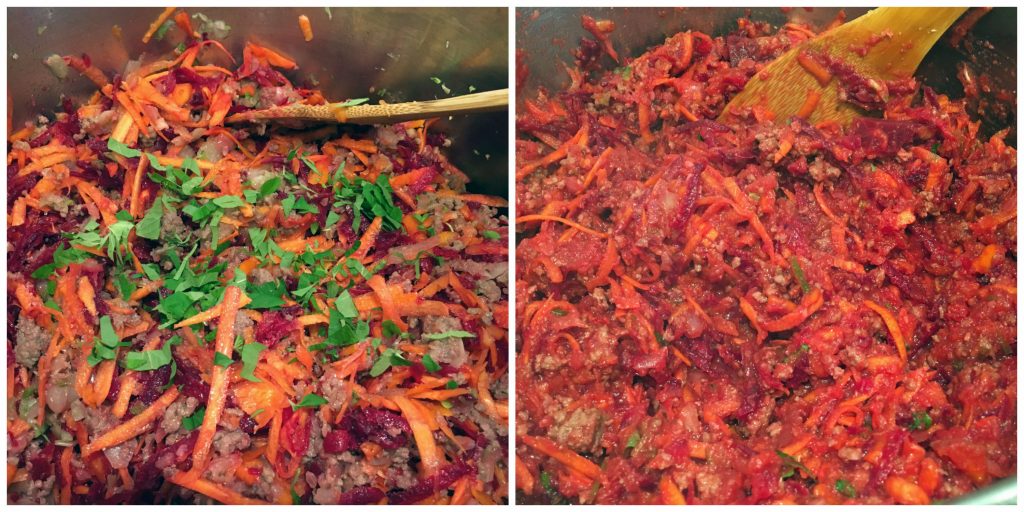
While the meat is browning, clean add in vegetables (I used carrot, beet and butternut squash). The exact distribution of the different vegetables doesn’t really matter, just remember that the more beet you add the more red the lasagna will be in the end, a small amount of beets will result in a more orange lasagna. Either mince the vegetables very finely, or grate them. I always grate them, because cutting them finely takes too long 😉 When the meat is brown, add the grated vegetables, salt and oregano. Give it a good stir and let it cook for about five minutes before adding the nomato sauce. Mix it well and let it simmer while you make the white sauce.
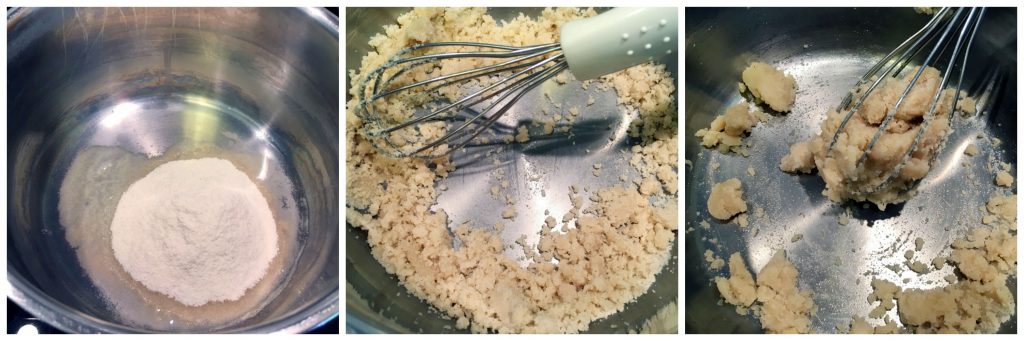
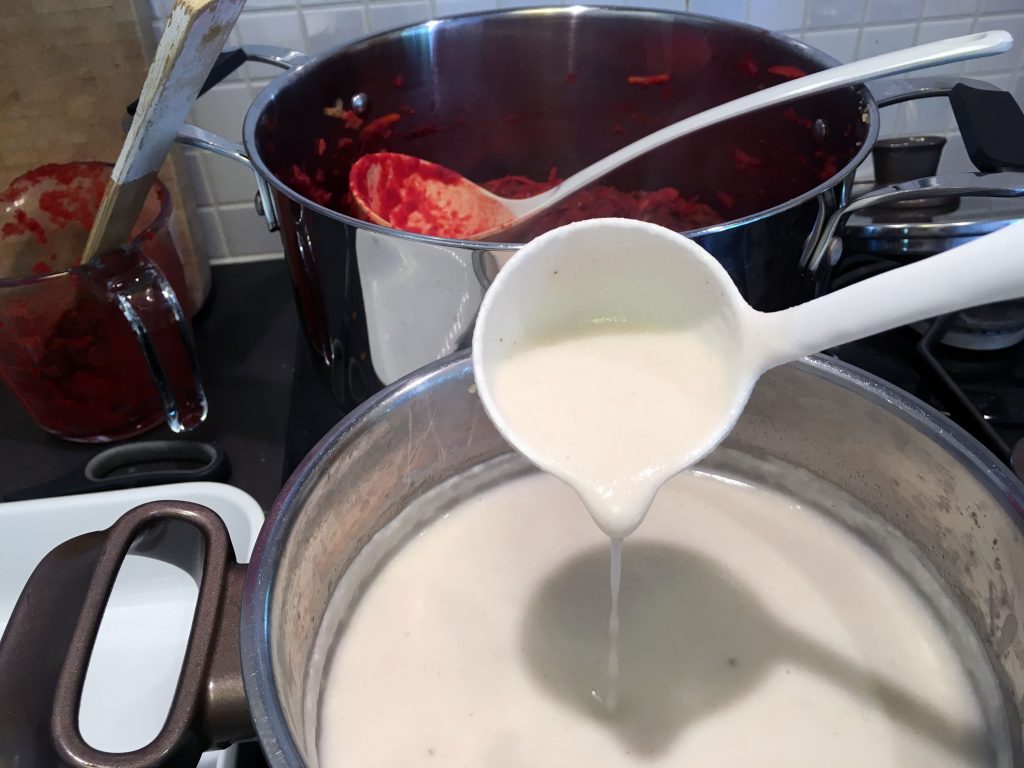
Now, turn on your oven to 180 °C (360 °F). And now it is time to tackle the white sauce. Melt the (coconut) oil, and add the rice flour. Stir to combine it well, it looks a bit like wet bread crumbs now. Turn off the heat! This is very important if you don’t want lumps in your white sauce. Now slowly add in the liquid, bit by bit, and whisk well between every bit of liquid added. It will slowly turn from “wet bread crumbs” to a thick paste and then a thinner and thinner paste. Then add the rest of the liquid and the salt. Turn the heat back on, medium heat.

This is usually the point where my kitchen looks like it exploded. Do you guys have that too? Or is it just something that happens in my kitchen? The “exploded kitchen” thing then leads to the “my kitchen is to small” thing. But then again I guess it is more about me than the kitchen, since my current kitchen is almost double as big as my first kitchen 😉 Anyways back to the white sauce….. you want to slowly bring it to a boil, while stirring often. This fits perfectly with the time is takes me to clean up my kitchen mess. Don’t freak out about the fact that the white sauce seems really thin, it will thicken during the time it will take for the sauce to get to a boil. Once it just starts to bubble, turn off the heat and let it rest for a bout 5 minutes, while you prepare for assembling your lasagna. The white sauce ends up being a bit thinner than the béchamel sauce I used make with cheese in it. But trust me on this one….. the longer the sauce cools down the thicker it gets. I never let it cool for long, because it it significantly easier to layer the lasagna with a more runny white sauce 😉
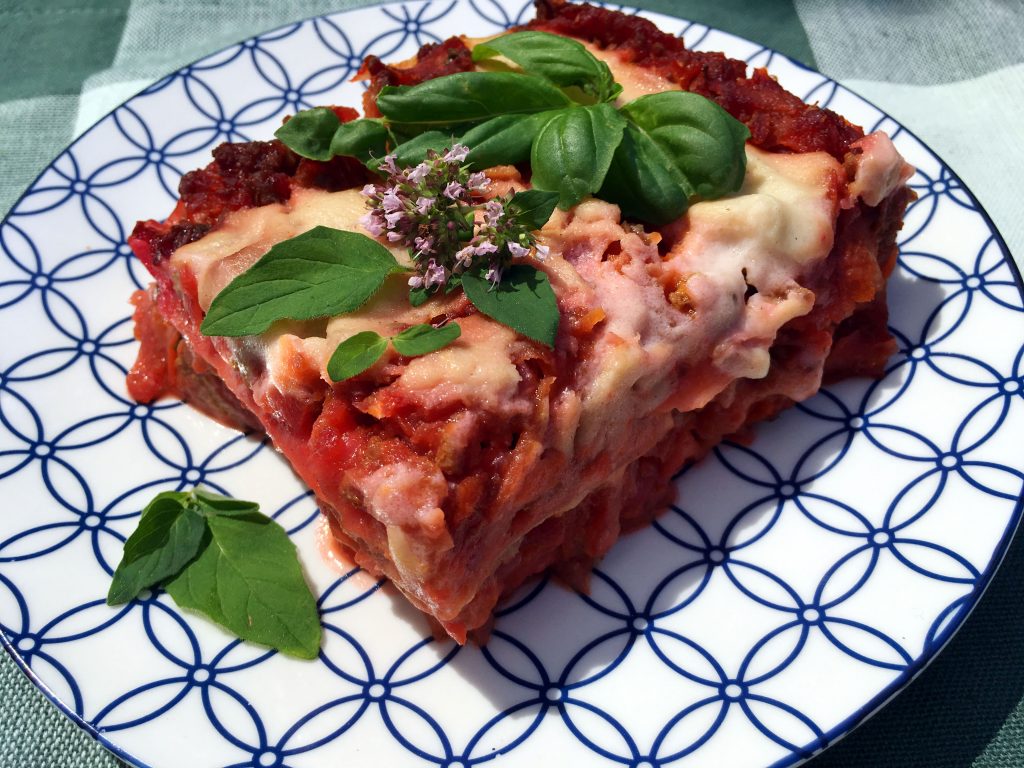
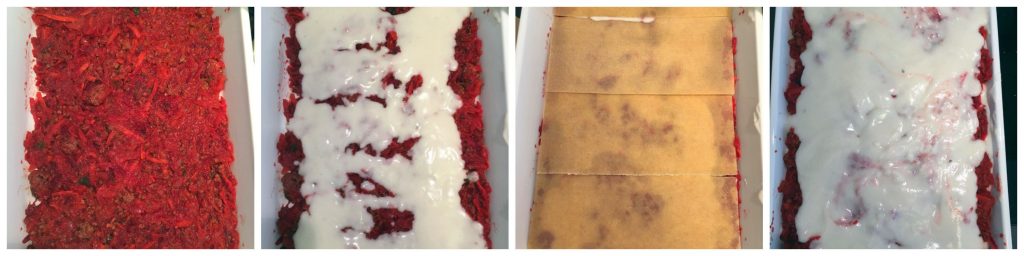
Assembly time! Get out your lasagna oven dish (ca. 20 cm x 30 cm/ 8″ x 12″), start with a layer of meat sauce, then a layer of white sauce and then a layer of lasagne plates. Repeat, and end with a layer of white sauce. I used whole grain spelt lasagne plates for this one. But you can of course use gluten free lasagne sheets, if you are gluten free. Or you can use thin slices of zucchini, mango or sweet potatoes if you prefer to leave out the pasta all together. For a fully grain free version, you of course need to replace the brown rice flour with a grain free flour. So far I have tested tigernut flour and coconut flour as a grain free replacement for the rice flour, and I can honestly say that the coconut flour does not make a good substitute. Tigernut flour is better, but not as good as the rice flour. You can see the different combinations I have tested out, in the notes below the recipe. I will continue to test out white sauces made with different flours and milks, and I will update the notes section along the way.
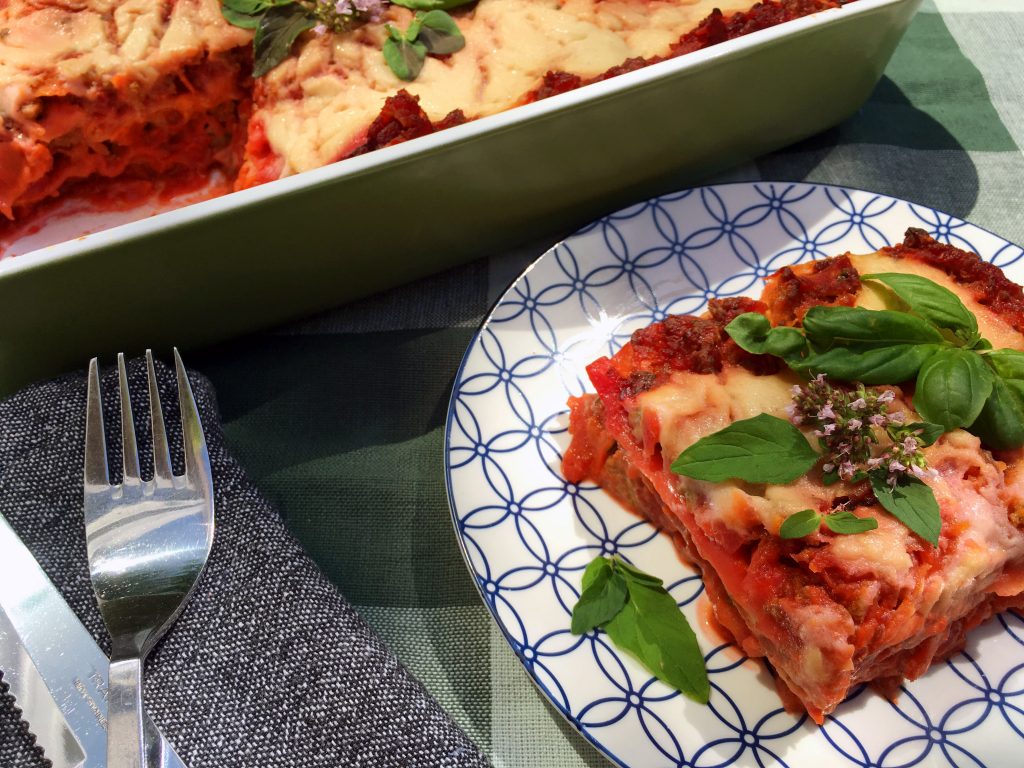
Now your lasagna is ready to go into the oven. It need 45-60 minutes at 180 °C (360 °F). You what the top layer to start to slightly brown. Let it rest for about 10-15 minutes before you serve it. Enjoy with a simple green salad or just as it is if you can’t be bothered 😉 This for me this is the ultimate comfort food and the fact that my kids and my hubby loves this dish only makes it so much better 🙂 Enjoy o/

Description
Low Histamine Lasagna, nightshade and dairy free.
Ingredients
Meat Sauce:
- 2 white onions
- 2 stalks of celery
- 2 cloves of garlic
- 300 g minced meat (I used ground beef)
- 350 g grated vegetables of choice (I used 175 g carrot, 125 g beet, and 50 g butternut squash)
- 750 g nomato sauce (ca. 700 ml/ 3 cups)*
- 2 tsp oregano (fresh)
- 1/2–1 tsp salt (I used pink himalayan salt)
- 1 tbsp (extra virgin) olive oil/coconut oil
White Sauce:
- 1 tbsp coconut oil
- 4 tbsp whole grain brown rice flour**
- 100 ml bone broth or tolerated bouillon (a bit less than 1/2 cup)***
- 650 ml almond milk**** (2 3/4 cups)
- 1–2 tsp salt (I used pink himalayan salt)
Lasagna sheets:
- 8 whole grain spelt lasagna plates*****
Instructions
- If you haven’t already made the Histamine Friendly Nomato Sauce, you need to start with that. You can find the link to the recipe for my nomato sauce below the recipe, make sure that you only add 2/3 of the bouillon/water, otherwise the meat sauce will be too wet. Note 1/2 a portion of the nomato sauce recipe is more than enough for making one lasagna. Adding this step add another 15 minutes to the total cooking time.
- Once you have all the ingredients for the nomato sauce cooking away in the pot, you can get going with the meat sauce for the lasagna. Dice the white onions and celery sticks very finely. Or if you are too lazy like me, this is when you get out your food processor and process it till it is finely chopped but not pureed.
- Heat up a tbsp of oil and add the celery and onion to the pot and cook, stirring a few times, until the onions are translucent. Add the garlic, and let it cook with the onion and celery for a bit – don’t let it brown.
- Turn the heat down to medium low and add the ground beef, and make sure to break up the meat, so that no big lumps are formed. (If you don’t tolerate ground beef, you can try ground turkey, or lentils if you don’t eat meat and tolerate them.)
- While the meat is browning, clean and grate the add in vegetables (I used carrot, beet and butternut squash). The exact distribution of the different vegetables doesn’t really matter, just remember that the more beet you add the more red the lasagna will be in the end, a small amount of beets will result in a more orange lasagna.
- When the meat is brown, add the grated vegetables, salt and oregano.
- Give it a good stir and let it cook for about five minutes before adding the nomato sauce. Mix it well and let it simmer while you make the white sauce.
- Now, turn on your oven to 180 °C (360 °F).
- And now it is time to tackle the white sauce. Melt the (coconut) oil, and add the rice flour. Stir to combine it well, it looks a bit like wet bread crumbs now.
- Turn off the heat! This is very important if you don’t want lumps in your white sauce.
- Now slowly add in the liquid, bit by bit, and whisk well between every bit of liquid added. It will slowly turn from “wet bread crumbs” to a thick paste and then a thinner and thinner paste.
- Then add the rest of the liquid and the salt. Turn the heat back on, low-medium heat.
- Slowly bring the white sauce to a boil, while stirring often, but not continuously.
- Don’t freak out about the fact that the white sauce seems really thin, it will thicken during the time it will take for the sauce to get to a boil. Once it just starts to bubble, turn off the heat and let it rest for a bout 5 minutes, while you prepare for assembling your lasagna.
- Assembly time! Get out your lasagna oven dish (ca.30 cm x 20 cm / 12″ x 8″), start with a layer of meat sauce, then a layer of white sauce and then a layer of lasagne plates. Repeat, and end with a layer of white sauce.
- Bake the lasagna in the oven for 45-60 minutes at 180 °C (360 °F). You what the top layer to start to slightly brown.
- Let it rest for about 10-15 minutes before you serve it. Enjoy with a simple green salad or just as it is if you can’t be bothered. Enjoy o/
Notes
- *You can find the link to my nomato sauce in the recipe or above in the text.
- ** See notes below for possible substitutions
- *** You can ommit this and just add an extra 100 ml almond milk.
- **** I chose almond milk for this recipe, because it thickens very well with the rice flour. See notes below for possible substitutions.
- ***** For a gluten free option use gluten free lasagna sheets, or go for a grain free option by using thin slices of zucchini, mango or sweet potatoes.
Notes on substitutions:
I chose to make this recipe with rice flour and almond milk, because they are fairly neutral taste wise and thickens nicely. However if you are grain free, nut free or just plainly can’t deal with almonds here are some notes on the different combinations I have been trying out so far (I will keep updating this list when I try out new combinations):
- Rice flour/Hemp milk – doesn’t thicken as well as the almond milk, but the taste is fine.
- Rice flour/Oat milk – thickens well and the taste is fine (so far this is the best nut free alternative to rice flour/almond milk I have tested).
- Tigernut flour/Almond milk – it doesn’t thicken as well as the almond milk, but the taste is ok.
- Coconut flour/Almond milk – doesn’t thicken well, and becomes grainy. I’m not a fan.
- Cassava flour (not tapioca)/Almond milk – thickens well and the taste is fine (so far this is the best grain free alternative to rice flour/almond milk I have tested).
If you have no problems with grains or gluten, rice flour can of course also be substituted with spelt flour. I will update this list, when ever I make new trials. If you try any combos I haven’t, please share your findings 🙂


Looks perfect!
Thank you Katoo,
I’m looking forward to hear what you think of it once you try it 🙂 I hope you guys had a great holiday. The pictures looks like you had a lovely time 🙂
Tania
OMG….my daughter and I just made your nomato sauce and have the lasagna in the oven! We had 2 noodles left over and sliced them up and put the sauce in it and we are speechless!! This is definitely going to be a game changer for us while we are on this journey and we are so thankful!!
This should be 5 stars…my computer was acting silly!
***** <3
Wow Kathrine! You just made my day 😀 Thank you for sharing this with me, it means the world 😀 And I’m so happy you and your daughter love the recipe 😀 <3
Looks delicious. But can I freeze this?
Hi Chloe,
Yes you can freeze it. But be aware, if you make it with premade nomato sauce which has already been frozen, I would freeze it a second time.
Tania
This is such a life-saving recipe to have come across. I don’t normally leave comments on things like this but after making this a few times now and being consistently delicious every time, I just wanted to take the time to say thank you for sharing this recipe for those who can’t tolerate so many things! I also can’t tolerate almonds including almond milk so I substituted rice milk with rice flour for the white sauce and it still turned out perfect and tasted fine in case anyone wanted to know 🙂
Hi Alice <3
Thank you so much for sharing Alice 🙂 That is a very useful tip 🙂 And I'm very happy you loved it so much, it is one of my favorite recipes too. <3
Tania
And I’d definitely give it 5 stars!
Thank you Alice <3
So excited to try this as I’m looking at going low histamine and saddened by all the things to say goodbye to. Looking forward to enjoying some comfort food.
Hi Tan,
I hope you’ll enjoy the recipe and find some new favorite comfort foods within the low histamine food limitations.
Tania